The Git Fork-Branch-Pull Workflow
A simple summary of how to collaborate on open-source projects using forking, branching and pull requests.
Introduction
I primarily use Git and GitHub for my open-source work. However, if your anything like me, using these tools sometimes feels like a bit of a black box, nicely summarised by this xkcd comic:
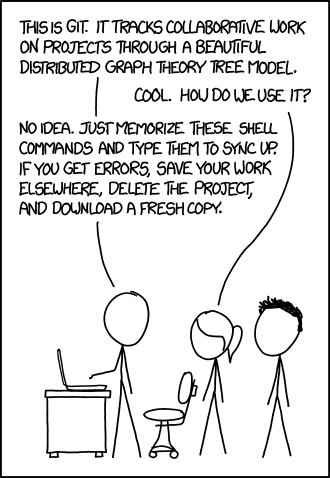 Git. Source:
xkcd.com
Git. Source:
xkcd.com
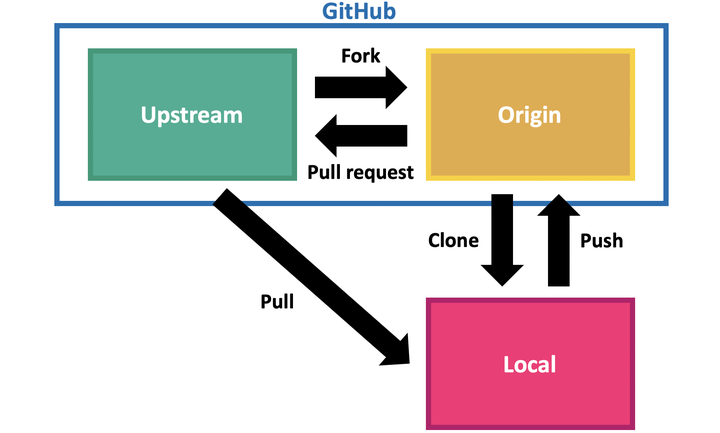
I particularly feel this way when wanting to contribute to others' open-source projects on GitHub. For this, we typically use the “fork-and-branch” workflow. I wanted to document my simple approach to this workflow here (for reference by my future self and others). The workflow comprises the following steps which are described in more detail in the subsequent sections:
- Fork a GitHub repository: navigate to a repository on GitHub and click the
Forkbutton. - Clone the repository locally:
git clone https://github.com/user/repo.git. - Add remote called “upstream” pointing to the original repository:
git remote add upstream https://github.com/user/repo.git. - Checkout a new branch (here called “new_feature”):
git checkout -b new_feature - Make desired changes to the local repository on this branch.
- Pull new changes from remote:
git checkout master,git pull upstream master. Sync dev branch:git checkout new_feature,git merge master. Push changes to your remote repository:git push origin new_feature. - Open a pull request on GitHub merging your changes with the upstream (original) repository.
- Once the pull request is accepted, you’ll want to pull those changes into your origin (forked repository). Change to master:
git checkout masterand pull:git pull upstream master. - Delete your feature branch using the GitHub website or, delete the local branch:
git branch -d new_feature, and delete the remote:git push origin --delete new_feature.
1. Forking a GitHub Repository
The first step is to fork the GitHub repository you want to work on. A “fork” is just an independent copy of a repository that you can develop on without affecting the original. To fork a repository, find it on GitHub and then click the Fork button.
2. Clone the repository locally
Before you can make changes to the repository you’ll first want to make a local copy on your computer. This is as simple as using git clone on the forked repository. Navigate to your forked repository on GitHub, click the “Clone or download” button and copy the url. Then, at the command line, clone the repository, for example:
$ git clone https://github.com/user/repo.git
3. Add a remote
When you cloned the forked repository onto your local computer, git automatically added a remote repository named “origin” pointing to the forked repository on GitHub. This means that when you do git add/git commit/git push you can push your local changes to the forked repository.
However, the goal here is to contribute to the original repository and we want to keep up to date with the original. While we are making changes, others might also be making changes and the original repository might be getting updated during the time you are adding a feature. So we want to add another remote pointing to the original repository so that we can periodically git pull any changes that have occurred in that repository such that we are working on the must up-to-date version of the code. We usually call this remote “upstream” and can add it using:
$ git remote add upstream https://github.com/user/repo.git
You can verify that you now have two remotes, “origin” and “upstream” using the following:
$ git remote -v
4. Checkout a new branch
Okay, so now we’ve made a fork of the repository we want to work on, we’ve cloned it to our local computer and also added a remote pointing back to the original repository. Now we can start making our desired changes. To do this, we are going to want to create a branch to work on. This branch will be independent of the clean, functioning “master” code and is a safe place for you to delete, modify and add code. You can actually have multiple branches (for different features) that you’re working on at the same time. To create a branch called “new_feature”, use the following:
$ git checkout -b new_feature
You can verify that you created the branch by using the following command which will show you all your local and remote branches:
$ git branch -a
5. Make changes
Now that you have an independent workspace (a branch) to work on, that will not break any of the existing code, you can get to work implementing your changes. As you work you will add and commit changes you make. It is likely that the longer you take to implement your changes, the more changes could be made to the original “upstream” code - which could be problematic, especially if the code you are changing on your branch also gets changed in the upstream repository, which can leave you with a bunch of troublesome “merge conflicts” to deal with later on. If you want to make sure your branch stays up-to-date with the original repository you forked, you’ll need to do two things. Firstly, update your “master” fork of the original repository by checking out the master branch and pulling from the upstream repository:
$ git checkout master
$ git pull upstream master
Then, go back to your branch and merge it with the master to incorporate any new changes:
$ git checkout new_feature
$ git merge master
6. Push changes
When you’ve made all the changes you want to make to the code you’ll want to push it to your remote “origin” to get it ready to show to the maintainers of the “upstream” (original) repository you wanted to contribute to in the first place. To do this:
$ git push origin new_feature
This will push your branch to your forked copy of the original repository.
7. Open a pull request
Finally, we can open a “pull request” which essentially asks the maintainers of the original repository to take a look at and hopefully integrate your code changes into their repository. To open a pull request, go to the GitHub website, navigate to your “new_feature” branch and follow the prompts to open a pull request. Note that for many popular repositories, there will be a number of tasks you should complete before opening a pull request. For example, checking that the code still passes a number of pre-written tests, that the documentation still renders, etc. These kinds of guidelines for contributing to a repository are typically included in a repository’s root directory in a file called something like “contributing.md”.
8. Updating your fork
Once the maintainers accept your changes, the code you wrote will now be incorporated into the original repository. Hooray! Once this is done, you’ll want to update your fork of the original repository (because it now includes the changes you added through your branch and pull request workflow). Locally, we will make sure we are on the master branch, and we will pull changes from the upstream (original) repository:
$ git checkout master
$ git pull upstream master
9. Deleting branches
Finally we can now delete our feature branch (both locally and remotely) because we no longer need it:
$ git branch -d new_feature
$ git push origin --delete new_feature
Note that during the pull request workflow on GitHub, you may have already deleted your feature branch by following prompts on GitHub which is fine too.